How to deploy Django application to HostPresto!

In this tutorial we will deploy Django Polls project from official Django tutorial to the HostPresto!
If you have started learning Django framework, you should be familiar with this tutorial project. Moreover, you should have this project on your local machine up and running, using Django built-in development webserver. Now we will deploy this project to HostPresto!
If you do not have the project on your machine, you may just clone my GitHub repository:
https://github.com/vallka/django-polls/
(How to run the Polls project locally is out of scope of this tutorial. Please refer to official docs to set up local development environment and build the project: https://docs.djangoproject.com/en/3.0/intro/tutorial01/. )
Here we will assume that you have the project set up into your local virtual environment. The project should have the following or similar structure on your machine:
└───mysite
 │   db.sqlite3
 │   manage.py
 │   README.md
 │   requirements.txt
 ├───mysite
 │       settings-production.py.sample
 │       settings.py
 │       urls.py
 │       wsgi.py
 │       __init__.py
 ├───polls
 │   │   admin.py
 │   │   apps.py
 │   │   models.py
 │   │   tests.py
 │   │   urls.py
 │   │   views.py
 │   │   __init__.py
 │   ├───migrations
 │   │       0001_initial.py
 │   │       __init__.py
 │   ├───static
 │   │   └───polls
 │   │       │   style.css
 │   │       └───images
 │   │               background.jpg
 │   └───templates
 │       └───polls
 │               detail.html
 │               index.html
 │               results.html
 └───templates
     └───admin
             base_site.html
Let’s start to set up our HostPresto! Environment.
Creating subdomain
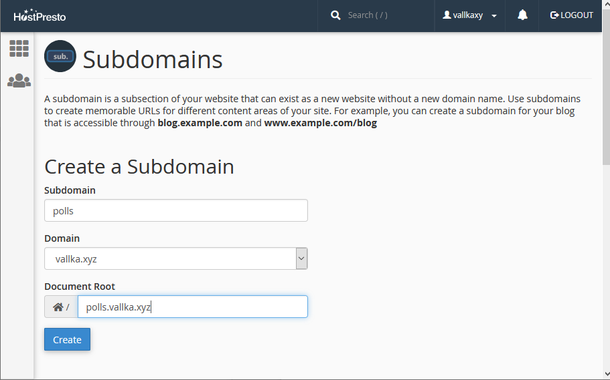
Suppose you have a domain registered with HostPresto! - yourname.xyz (BTW .xyz domains are the cheapest :). For this tutorial, we will create a subdomain polls.youname.xyz We think this is the most natural and straightforward method. Setting up the tutorial project in the root domain may pollute your space. You may also have some website sitting there already. Adding a subdirectory like www.youname.xyz/polls is less convenient, in our opinion.
Log in into cPanel and click on Subdomains in DOMAINS section. Enter ‘polls’ into Subdomain field. Select your main domain (youname.xyz) from Domain dropdown. Document Root will be auto populated with ‘polls.yourname.xyz’. Let’s accept the default value. Click Create.
Subdomain created. If you point your browser to http://polls.yourname.xyz, most probably you will see a directory listing – something like this:
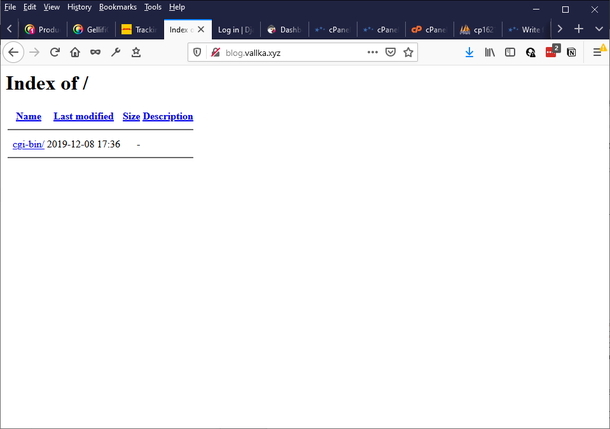
This is how an empty website looks like on HostPresto!
Setting up Python application
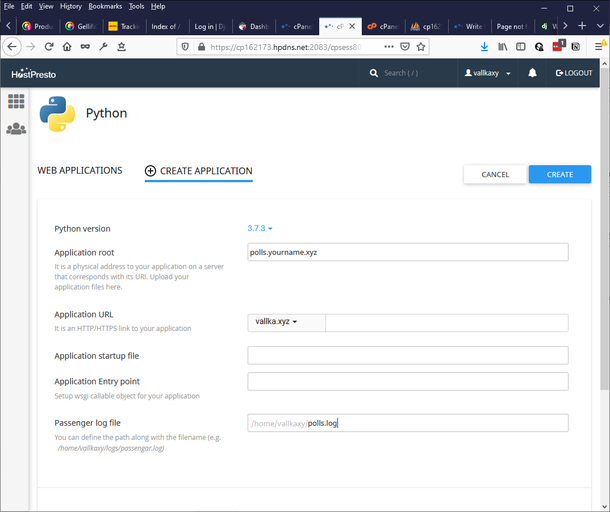
In cPanel go to SOFTWARE section and select Setup Python App. Click on CREATE APPLICATION.
HostPresto! Uses software from Passenger (https://www.phusionpassenger.com/) to set up Python applications. The setup page isn’t very intuitive, in my opinion. But let’s use it anyway.
Select the latest Python version in the first field. It is 3.7.3 at the moment of writing. In Application root type in the directory name we have created in the previous step, relatin to your home directory – that is, just ‘polls.yourname.xyz’. Select ‘polls.yourname.xyz’ as Application URL in the next line. Leave Application startup file and Application Entry point empty – the system will create this file by its own rules and let it do it. Last thing – it is sensible to name a log file (Passenger log file) – enter /home/yourname/polls.log
Click on CREATE
Click in START APP
Again, point your browser to http://polls.yourname.xyz (or refresh page if you still have it in one of the tabs). Now it should show something like this:
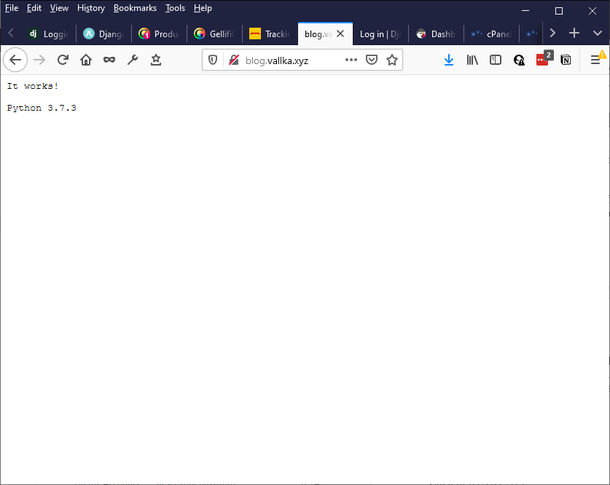
This means we have successfully created a virtual environment for our Python application.
Uploading project files.
To upload files we will use any FTP client. You can find all needed information (FTP host, port, credentials) in FILES – FTP Accounts section of cPanel. Remember to use cPanel username and password (the ones you can find on your Welcome email), not HostPresto! Client area email/password. (You can also connect via SFTP using the same sPanel credentials. Please notice that you need to use port 88 for SFTP, not standard port 22. ) You can even use cPanel File Manage to upload files, but this is too cumbersome, in my opinion.
Navigate to newly created directory polls.yourname.xyz. This will be the root directory for our project, corresponding to ‘outer mysite/’ directory mentioned in Django Polls tutorial. Upload the whole structure here. (Ensure that manage.py file resides directly in polls.yourname.xyz directory)
We will need requirements.txt file which should also live in root project directory - polls.yourname.xyz. Most probably you already have this file in you project directory on your local machine, so it is already uploaded to the server. But if there is no such file, you need to create it. For this, go to your project directory on your local machine, activate your project virtual environment (running command source /path/to/ENV/bin/activate or similar method), then run command:
pip freeze > requirements.txt
This will create requirements.txt file. The content if this file should look something like this:
asgiref==3.2.3
Django==3.0
pytz==2019.3
sqlparse==0.3.0
Numbers may differ, there may be more lines. It shouldn’t matter for now.
Upload this file to root project directory (polls.yourname.xyz) if it is not already there.
Installing Python packages
Once we have a virtual environment, we have to install needed packages. How to do this, is not particularly clear from cPanel web interface. Yes, we can do it directly in web interface (we need to type ‘requirements.txt’ - if we have this file in root subdirectory – in ‘Configuration files’ section, click ADD, then click ‘Run Pip install'), but we won’t do it this way. Let’s do it in traditional way, running shell command. We will need to use shell commands anyway, so let’s go to command line straight away.
We need to make a ssh connection to our server. If you are on Windows, I recommend to use PuTTY program. Use your cPanel username and password (not client area password!) and change port 22 to 88 – HostPresto uses port 88 for ssh connection.
Once logged in, activate your project virtual environment and cd into project directory. How to do this? Actually cPanel contains a useful hint: at the top of the page the command is displayed:
Enter to the virtual environment. To enter to virtual environment, run the command:
source /home/yournamexy/virtualenv/polls.yourname.xyz/3.7/bin/activate && cd /home/yournamexy/polls.yourname.xyz
Just click on command and it will be copied to the clipboard.
Paste the command to PuTTY terminal window and run it – now you are in your project directory and virtual environment is activated. First of all, let’s upgrade pip – run the command
pip install --upgrade pip
Now we can install python packages needed for the project. Remember, we have a list in requirements.txt file. Run the following command:
pip install -r requirements.txt
After some busy work of the system, all needed packages are installed.
First attempt to run
You should already know that first we need to (re)create a database. For this, as you know, the following command needed:
python manage.py migrate
Run it. Most probably, you will get a long list of errors. The very last line contains the actual error, something like this:
django.core.exceptions.ImproperlyConfigured: SQLite 3.8.3 or later is required (found 3.7.17).
Actually, this is good that we run into this error in the very first step. (If not and your migration completed successfully you still need to read further!). As you may remember, for local development you have used SQlite server, built-in Python SQL server. This is completely fine for local development, but totally unacceptable for production server (and we are pretending to deploy to production server now). So luckily for us, Django doesn’t like the version of installed SQlite server, so there is no other way than to switch to MySQL. (Traditionally Django uses PostgreSQL but in our case we have MySQL pre-installed, so we will use MySQL)
So let’s return to cPanel and create a MySQL databse, using available tools.
Creating MySQL database for the project
This is easy. In cPanel, go to DATABASES – MySQL Database Wizard. Type in a name for a database. Let’s call it 'polls' in order to be consistent. cPanel automatically prefixes the database name with yournamexy_, so the full name will be 'yournamexy_polls'. Click on Next Step, provide a name and a password for new database user (let’s give the user the same name: 'yournamexy_polls'). Provide a password. Click Next. On Step 3 check ALL PRIVILEGES. Click Next.
Don’t forget newly created password – we’ll need it in a minute.
Creating settings-production.py file
Now we have to alter our settings.py file – change SQlite database with MySQL. How will we do it?
Updating the settings.py file itself is not a good idea. Yes, we can do it, directly on the server, but we won’t be able to use this file on a local computer. How to solve it? Usually a project has two or more settings.py files – one for dev server, one for production, possibly one for staging server. We will create a second file for production - let’s call it settings-production.py
I recommend to do it on your local machine and upload it on the server afterwards. So navigate ‘inner mysite/’ directory on you local machine. File settings.py should be there. Alongside this file create a new file settings-production.py. Put the following line at the top of the file:
from . settings import *
We simply import all settings from our existing settings.py file. Now we need to override some of them. Let’s do it one by one, to make things clear, what and why we are overriding.
First of all, we need to change DATABASES. So add the following lines:
DATABASES = {
    'default': {
        'ENGINE': 'django.db.backends.mysql',
        'NAME': 'yournamexy_polls',
        'USER': 'yournamexy_polls',
        'PASSWORD': os.environ['POLLS_DB_PASSWORD'],
        'HOST': 'localhost',
    }
}
(Replace yournamexy_polls with your own name yor have created in previous step)
It’s not a good idea to hardcode the database password, so we will read it from environment variable.
Upload the file to the server
Running manage.py on production server
How should we tell Django to use setting-production.py instead of settings.py? All we need is to set an environment variable DJANGO_SETTINGS_MODULE
So run in ssh session:
export DJANGO_SETTINGS_MODULE=mysite.settings-production
Remember, we also need to set a variable for a password:
export POLLS_DB_PASSWORD=<your password>
(Use a password you have chosen when creating a database)
Now we are ready to run migration in production environment. Run agan:
python manage.py migrate
Now it should finish successfully.
(You may found out that it ended with error - complaining that 'package mysqlclient not found'. In this case you simple need to install needed package:
pip install mysqlclient
)
Create a superuser:
python manage.py createsuperuser
Now we need to finish configuring the Python applications
Configuring passenger_wsgi.py
Return to cPanel – Setting Python App page.
You will see that Application startup file and Application Entry point fields are populated now.
Application startup file is called passenger_wsgi.py. Find this file in the root folder of our project. Open it in File Manager. It should look like this:
import os
import sys

sys.path.insert(0, os.path.dirname(__file__))

def application(environ, start_response):
    start_response('200 OK', [('Content-Type', 'text/plain')])
    message = 'It works!\n'
    version = 'Python %s\n' % sys.version.split()[0]
   response = '\n'.join([message, version])
   return [response.encode()]
We don’t need all this. So delete the content and replace it with the following:
import os

from django.core.wsgi import get_wsgi_application

os.environ.setdefault('DJANGO_SETTINGS_MODULE', 'mysite.settings-production')
application = get_wsgi_application()
(if you have cloned my GitHub project, you should have a file called passenger_wsgi.py.sample. It is called .sample on purpose – the system will auto-create this file for us, so initial content would be overwriten anywat. So rename the files or copy-paste the content from passenger_wsgi.py.sample to passenger_wsgi.py)
As you can see, DJANGO_SETTINGS_MODULE variable is set here. We also need to set out db password. We can do it here as well (what is not a very good idea if we going to check in this file to GitHub), or set up POLLS_DB_PASSWORD variable in cPanel. What we’ll do in Environment variables section of Python Application page. Click ADD VARIABLE, type in POLLS_DB_PASSWORD and your password, click done. Then click SAVE on top of the page. Finally, click RESTART
Point your browser to http://polls.yourname.xyz and refresh page. Most probably you will see:
DisallowedHost at /

Invalid HTTP_HOST header: 'polls.yourname.xyz'. You may need to add 'polls.yourname.xyz' to ALLOWED_HOSTS.
Thankfully, the message is very clear. ALLOWED_HOSTS = [] in settings.py, what is fine for development. Now we need to override this settings for production. Open settings-production.py file and add the line:
ALLOWED_HOSTS = ['polls.yourname.xyz']
(Replace 'yourname.xyz' with your actual subdomain)
RESTART application again
Page not found (404)
Request Method:     GET
Request URL:    http://polls.yourname.xyz/
Ok, this is expected. Remember, this is no ‘/’ path defined in urlpatterns in urls.py (unless you have added it of course). Navigate to http://polls.yourname.xyz/polls -
No polls are available.
This is exactly what we expected to see. Navigate to
http://polls.vallka.xyz/admin
You can log in using superuser username and password and create some polls now.
Static Files
Ok, everything seems to be working now... but where is my background? And the admin panel looks like it lost all css styles... In fact it did.
Remember, .css, .js, image files are not served by default by Django on production server. They are on local development server, but to use them on production a few more steps needed. Actually, there are two ways to add static files to production website – an easy one and... not so easy one, but recommended by Django and supported out of box.
Let’s start with the second one, more complicated default Django way. This will give us more understanding of Django.
According to Django philosophy, all static files must be placed to another webserver. Let’s simulate this another webserver with a second subdomain. Let’s create a subdomain called ‘polls-static’. On cPanel, go to cPanel and click on Subdomains in DOMAINS section. Enter ‘polls-static’ into Subdomain field. Select your main domain (youname.xyz) from Domain dropdown. Accept the auto populated value for subdomain root - ‘polls-static.yourname.xyz’. Click Create.
Now we have a separate subdomain where we will put out static files. Open settings-production.py in File Manager – Edit file and add two lines:
STATIC_ROOT = '/home/yournamexy/polls-static.yourname.xyz/'
STATIC_URL = 'http://polls-static.yourname.xyz/'
You may remember that settings.py already contains a line:
STATIC_URL = '/static/'
In settings-production.py we have overridden this value with a new one. STATIC_ROOT is a new setting, we didn’t have it at development, as it wasn't needed.
Now go to SSH terminal. If you logged of, log back in. Important! Do not forget activate and cd into you virtual environment and export environment variables:
source /home/younamexy/virtualenv/polls.youname.xyz/3.7/bin/activate && cd /home/vallkaxy/polls.yourname.xyz
export DJANGO_SETTINGS_MODULE=mysite.settings-production

export POLLS_DB_PASSWORD=<your password>
These commands are saved in bash history, so it will be easy to repeat them. (You may add them to your .bashrc if you want them to be executed automatically upon log on)
Now run the following command:
python manage.py collectstatic
Type 'yes' if prompted
After a while you will see:
132 static files copied to '/home/yournamexy/polls-static.yourname.xyz'
All static files from different subdirectories of polls project (including admin files) are now copied to '/home/yournamexy/polls-static.yourname.xyz/' directory. You can open it in File Manager and see it.
Now restart application on Python Application page
Refresh polls.yourname.xyz/polls and polls.yourname.xyz/admin
Now all should be displayed exactly as it was on your local development server.
Look ar page source of /polls/ page. You may find a line:
<link rel="stylesheet" type="text/css" href="http://polls-static.yourname.xyz/polls/style.css">
If you have worked on local development server, you may recall that the same line looked like this:
<link rel="stylesheet" type="text/css" href="/static/polls/style.css">
You see, now, on production, style.css file (and other static files) is server from different subdomain.
This is how it supposed to work with Django by default.
However, there is a simpler way.
Using WhiteNoise package for serving static files
All this additional setup with additional polls-static subdomain was required because Django wants us to put Python code and static files on separate webservers – in the sake of efficiency. However, in our case, these two subdomains are still served by the same webserver. So why all these additional efforts?
Luckily, adding one more package - WhiteNoise – allows to reduce a headache. Go to ssh terminal and run:
pip install whitenoise
Next, edit settings.py – not settings-production.py, the main settings.py file. WhiteNoise works equally well in development and production environments. Add a line to MIDDLEWARE:
MIDDLEWARE = [
 'django.middleware.security.SecurityMiddleware',
 'whitenoise.middleware.WhiteNoiseMiddleware',  # new
 'django.contrib.sessions.middleware.SessionMiddleware',
 'django.middleware.common.CommonMiddleware',
 'django.middleware.csrf.CsrfViewMiddleware',
 'django.contrib.auth.middleware.AuthenticationMiddleware',
 'django.contrib.messages.middleware.MessageMiddleware',
 'django.middleware.clickjacking.XFrameOptionsMiddleware',
 ]
(it should be placed directly after 'django.middleware.security.SecurityMiddleware' according to WhiteNoise documentation)
Add this line at the end of the file, after STATIC_URL:
STATIC_ROOT = os.path.join(BASE_DIR, 'staticfiles')
‘staticfiles’ is a special name, known to WhiteNoise
Now comment out (or simply delete) the two lines in settings-production.py we added previously:
#STATIC_ROOT = '/home/yourname/polls-static.yourname.xyz/'
#STATIC_URL = 'http://polls-static.yourname.xyz/'
We don’t need them any more.
In ssh terminal, run collectstatic again:
python manage.py collectstatic
Restart application and refresh application pages. Now you will see the same working application, and references to static files in page source will look exactly as on development server, e.g.:
<link rel="stylesheet" type="text/css" href="/static/polls/style.css">
But don’t think that WhiteNoise package is for simplifying stuff only. If you really need it, with just a few configuration variables you can set up your static files on different server, as before, or on cloud storage or CDN. So it can be benefitial for performance also if set up accordingly.
One last step
On production server, we shouldn't forget to switch DEBUG off. So add the final line to settings-production.py:
DEBUG = False
All done.
We won’t go further in this tutorial. Now we have successfully deployed our application on HostPresto! Server, and learned two different methods of serving static files.
HostPresto! is reasonably priced and reliable hosting. What makes it outstanding — like many hosting providers they give you PHP and MySQL out of the box, but unlike most of other providers, they give you a very simple solution to host almost any kind of application, Node.js, Django, Flask, Ruby-on-Rails to mention a few. And all this zoo of applications can co-exist on the same server! What makes HostPresto! a great choice for any developer.
HostPresto are one of the leading independent, affordable website hosts.
hostpresto.com
How to start Django application from scratch on HostPresto!
In this tutorial we will create a brand new Django application on HostPresto!
Let’s start to set up our HostPresto! Environment.
Creating subdomain
Suppose you have a domain registered with HostPresto! - yourname.xyz (BTW .xyz domains are the cheapest :). For this tutorial, we will create a subdomain start.youname.xyz We think this is the most natural and straightforward method. Setting up the tutorial project in the root domain may pollute your space. You may also have some website sitting there already. Adding a subdirectory like www.youname.xyz/start is less convenient, in our opinion.
Log in into cPanel and click on Subdomains in DOMAINS section. Enter ‘start’ into Subdomain field. Select your main domain (youname.xyz) from Domain dropdown. Document Root will be auto-populated with ‘start.yourname.xyz’. Let’s accept the default value. Click Create.